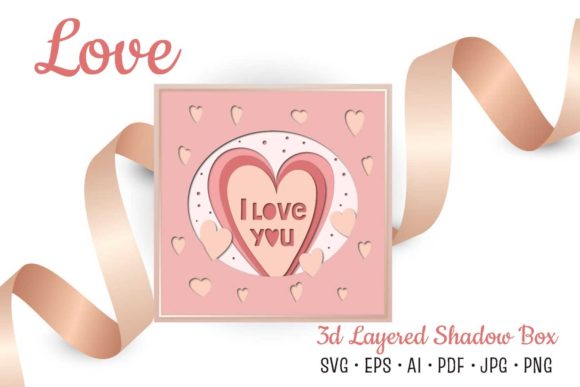
I Love You Card with 3D Shadowbox Design
Creating a heartfelt gift that truly stands out often requires more than just words on a page. It demands creativity, personal touch, and a design that captures the depth of your feelings. This is where the I Love You Card and Shadowbox 3D Layered Papercut design becomes an essential tool for anyone looking to celebrate St. Valentine's Day or any special occasion. Unlike standard greeting cards, this papercut template offers a dynamic, multi-dimensional experience that transforms simple paper into a stunning piece of art.
The core appeal of this design lies in its ability to create a shadowbox effect. By utilizing six distinct layers, the project adds depth and texture that flat printing simply cannot achieve. When assembled, these layers create a beautiful interplay of light and shadow, making the "I Love You" message pop off the page. Whether you are a seasoned crafter or someone who has never used a cutting machine before, this template provides a structured path to creating professional-looking decor without needing advanced artistic skills.
Why Choose a Papercut Template for Your Gifts?
In a world dominated by digital messages and mass-produced items, handmade gifts hold a unique value. They show time, effort, and thoughtfulness. The St Valentine holiday DIY decor possibilities offered by this SVG cutting file allow you to craft something that feels bespoke and exclusive. You are not just giving a card; you are gifting a keepsake that can be framed, displayed on a shelf, or kept as a cherished memory.
This specific papercut template is designed to solve the common problem of limited crafting skills. Many people want to make elaborate projects but feel intimidated by complex patterns or intricate hand-cutting requirements. With this digital file, the precision work is handled by your cutting machine. You simply load the material, run the cut, and then assemble the pre-cut pieces. The result is a clean, crisp design that looks like it was made by a master artisan.
Beyond romantic gestures, this design serves various needs. It is perfect for:
- Home Decor: Create a centerpiece for your living room or a decorative accent for a bedroom wall.
- Small Business Products: Entrepreneurs and small business owners can use these files to create inventory for craft fairs or online shops, selling finished shadowbox cards or kits.
- Educational Projects: Educators can guide students through the process of digital fabrication and assembly, teaching them about layering and spatial design.
- Personal Expression: Use it as a card for a day to remember, such as an anniversary, birthday, or even a "just because" moment to brighten someone's day.
Technical Details and File Compatibility
Before diving into the creative process, it is crucial to understand the technical specifications to ensure a smooth workflow. The I Love You Card with Shadowbox 3D Layered design comes in a comprehensive package tailored for modern crafting machines like Cricut and Silhouette Studio. The files are provided in a convenient .zip folder, which organizes everything neatly for easy access.
Inside the download, you will find multiple formats to suit different software preferences and needs:
- Vector Files (AI, EPS, SVG): These are the most important files for cutting. Being vector-based, they can be resized from a tiny sticker to a large wall hanging without losing any quality. You can also change the colors within your design software to match your theme perfectly.
- Raster Images (JPEG, PNG): For those who need quick previews or images for social media, there are folders containing high-resolution JPEGs with white backgrounds and PNGs with transparent backgrounds.
- Layered Files (AI and EPS10): To simplify the assembly process, the package includes one AI layered file and one EPS10 layered file. These keep all six layers grouped together, ensuring you don't lose track of the order during assembly.
- PDF Folder: Includes a sample image to help visualize the final product before you start cutting.
The design resolution is set at 9 x 9 inches, which translates to 2700 x 2700 pixels at 300 DPI. This ensures that every detail of the papercut pattern is sharp and clear when printed or cut. All images are in RGB color mode. Please note that due to variations in screen settings and monitor calibration, the colors displayed on your device may slightly differ from the final physical output. However, since you have full control over the color settings in your design software, you can easily adjust the hues to get the exact look you desire.
Understanding the Six-Layer Structure
The magic of the shadowbox effect comes from the six-layer template. Each layer is numbered accordingly, guiding you through the assembly process. Typically, the layers range from the background base to the foreground text or heart shapes. This numbering system prevents confusion, ensuring that each piece sits in the correct position to create the desired depth. When you stack these layers using adhesive foam pads or glue dots, the shadows cast between them bring the design to life.
For beginners, the key to success here is patience. Take your time to align the layers correctly. The beauty of this SVG cutting file is that if you make a mistake, you can simply re-cut a layer from the digital file. There is no waste of precious materials until the final assembly stage.
Getting Started: A Practical Guide
If you are new to this type of crafting, the process might seem daunting, but it is actually quite straightforward once you break it down. First, ensure your cutting machine supports the file formats included in the item. Most modern machines handle SVG, DXF, and AI files natively, but always double-check your user manual.
Once you have loaded the file into your software (such as Cricut Design Space or Silhouette Studio), you can customize the design. Do you want a classic red and pink palette? Or perhaps a modern black and gold aesthetic? Since the files are vectors, changing the color is as simple as selecting a shape and applying a new fill color. You can also resize the entire composition to fit different cardstock sizes or frame dimensions.
After cutting, the assembly phase begins. Lay out your six layers in numerical order. Apply adhesive to the back of each layer, leaving the very front layer free of glue so it remains the focal point. Gently press the layers together, ensuring they are centered. The result is a textured, 3D artwork that feels substantial and luxurious.
Considerations for Success
While this template is user-friendly, there are a few things to keep in mind to achieve the best results. The choice of paper matters significantly. Heavier cardstock works best for the structural integrity of the shadowbox, while lighter paper might collapse under the weight of the layers. Experiment with different textures, such as glitter paper, metallic foil, or matte finishes, to add another dimension to your St Valentine holiday heart decor.
Additionally, consider the lighting in the space where you plan to display your creation. The shadowbox effect relies on light hitting the layers at an angle to create shadows. Placing the finished card near a window or under a soft lamp will enhance the visual impact, making the "I Love You" message appear to float in mid-air.
Whether you are creating a unique gift for a loved one, adding a personal touch to your home, or producing items for your small business, this I Love You Card design offers versatility and elegance. It bridges the gap between digital convenience and the tactile joy of handmade crafts. By providing high-quality, resizable files and clear instructions, it empowers creators of all skill levels to produce memorable art that celebrates love and connection.